爬虫系列:穿越网页表单与登录窗口进行采集(二)
上一期我们讲解了 Python Requests 库、提交一个基本表单、HTML 相关控件等内容。
本篇文章我们接着上一期文章介绍通过 Python Requests 提交文件和图像、处理登录 cookie、HTTP 基本接入认证以及其他表单相关问题。
提交文件和图像
虽然上传文件在网络上很普遍,但是对于网络数据采集其实不太常用。但是,如果你想为自己网站的文件上传一个测试实例,也可以通过 Python Requests 库实现。不管怎么说,掌握工作原理总是有用的。
下面是一个文件上传的源代码示例:
<label class="UploadPicture-wrapper">
<input type="file" accept="image/png,image/jpeg" class="UploadPicture-input">
<button type="button" class="Button UserCoverEditor-simpleEditButton DynamicColorButton DynamicColorButton--dark">
<span style="display: inline-flex; align-items: center;"></span> 编辑封面图片
</button>
</label>
文件上传表单除了 <input> 标签里有一个 type 属性是 file,看起来和上一篇文章中的文字字段并没有什么两样。其实,Python Requests 库对这种表单的处理方式和之前非常相似:
import requests


def upload_image():
    files = {'uploadFile': open('files/2fe7243c7c113fad443b375a021801eb6277169d.png', 'rb')}
    r = requests.post("http://pythonscraping.com/pages/processing2.php", files=files)
    print(r.text)


if __name__ == '__main__':
    upload_image()
需要注意,这里提交给表单字段 uploadFile 的值不一定是一个简单的字符串,而是一个使用 open 函数打开的 Python 文件对象。在这个例子当中,我们提交了一个保存在我们电脑上的图像文件,文件路径是相对于这个 Python 程序所在的位置。
处理登录和 cookie
到此为止,我们介绍过的大多数表单都允许你向网站提交信息,或者让你在提交表单后立即看到想要的页面信息。那么,那些表单和登录表单(当你浏览网站时让你保持“已登录“状态)有什么不同?
大多数的现代网站使用的是 cookie 跟踪用户是否已登录的状态信息。一旦网站验证了你的登录权证,他就会将它们保存在你浏览器的 cookie 中,里面通常包含一个服务器生成的令牌,登录有效时限和登录状态追踪信息。网站会把这个 cookie 当作信息验证的凭据,在你浏览网站的每个页面时出示给服务器。在 20 世纪 90 年代中期广泛使用 cookie 之前,保证用户安全验证并追踪用户是网站上的一大问题。
虽然 cookie 为网络开发者解决了大问题,但同时却为网络爬虫带来了大问题。你可以一整天只提交一次登录表单,但是如果你没有一直关注表单后回传给你的那个 cookie,那么一段时间以后再次访问新页面时,你的登录状态就会丢失,需要重新登录。
现在我们有一个博客的管理后台,我们需要登录才能发布文章和上传图片,下面我们通过使用 Python Requests 模拟登录,并追踪 cookie,下面是代码示例:
import requests
from bs4 import BeautifulSoup
from requests import Session, exceptions

from utils import connection_util

class GetCookie(object):
    def __init__(self):
        self._session = Session()
        self._init_connection = connection_util.ProcessConnection()

    def get_cookie_by_login(self):
        # 另外一个 session 中
        get_token=self.request_verification_token()
        if get_token:
            params = {'__RequestVerificationToken': get_token, 'Email': 'abc@pdf-lib.org',
                    'Password': 'hhgu##$dfe__e',
                    'RememberMe': True}
            r = self._session.post('https://pdf-lib.org/account/admin', params)
            # 如果使用 request_verification_token 此处会出现 500 错误
            if r.status_code == 500:
                print(r.content.decode('utf-8'))
            print('Cookie is set  to:')
            print(r.cookies.get_dict())
            print('--------------------------------')
            print('Going to post article page..')
            r = self._session.get('https://pdf-lib.org/Manage/ArticleList', cookies=r.cookies)
            print(r.text)

    def request_verification_token(self):
        # 此处仍然会获取所需要的内容
        get_content = self._init_connection.init_connection('https://pdf-lib.org/account/admin')
        if get_content:
            try:
                get_token = get_content.find("input", {"name": "__RequestVerificationToken"}).get("value")
            except Exception as e:
                print(f"ot unhandled exception {e}")
                return False
            return get_token


if __name__ == '__main__':
    get_cookie = GetCookie()
    get_cookie.get_cookie_by_login()
上面的代码我们向登录页面发送相关参数,作用就是模拟我们输入用户名与密码登录页面。然后我们从请求中获取 cookie,打印登录结果。
对于简单的页面我们可以这样处理没有问题,但是如果网站比较复杂,他经常会暗自调整 cookie,或者如果我们一开始都不想使用 cookie,应该怎么处理呢?Requests 库的 session 函数可以完美的解决这些问题:
import requests
from bs4 import BeautifulSoup
from requests import Session, exceptions

from utils import connection_util

class GetCookie(object):
    def __init__(self):
        self._session = Session()
        self._init_connection = connection_util.ProcessConnection()

    def get_cookie_by_login(self):
        # 另外一个 session 中
        get_token=self.get_request_verification_token()
        if get_token:
            params = {'__RequestVerificationToken': get_token, 'Email': 'abc@pdf-lib.org',
                    'Password': 'hhgu##$dfe__e',
                    'RememberMe': True}
            r = self._session.post('https://pdf-lib.org/account/admin', params)
            # 如果使用 request_verification_token 此处会出现 500 错误
            if r.status_code == 500:
                print(r.content.decode('utf-8'))
            print('Cookie is set  to:')
            print(r.cookies.get_dict())
            print('--------------------------------')
            print('Going to post article page..')
            r = self._session.get('https://pdf-lib.org/Manage/ArticleList', cookies=r.cookies)
            print(r.text)

    def get_request_verification_token(self):
        # 连接网站
        try:
            headers = {
                "User-Agent": "Mozilla/5.0 (Windows NT 10.0; Win64; x64) AppleWebKit/537.36 (KHTML, like Gecko) Chrome/85.0.4183.121 Safari/537.36",
                "Accept": "text/html,application/xhtml+xml,application/xml;q=0.9,image/avif,image/webp,image/apng,*/*;q=0.8,application/signed-exchange;v=b3;q=0.9"}
            html = self._session.get("https://pdf-lib.org/Account/Login", headers=headers)
        except (exceptions.ConnectionError, exceptions.HTTPError, exceptions.Timeout) as e:
            return False
        try:
            bsObj = BeautifulSoup(html.text, features='html.parser')
        except AttributeError as e:
            return False
        if bsObj:
            try:
                get_token = bsObj.find("input", {"name": "__RequestVerificationToken"}).get("value")
            except Exception as e:
                print(f"ot unhandled exception {e}")
                return False
            return get_token


if __name__ == '__main__':
    get_cookie = GetCookie()
    get_cookie.get_cookie_by_login()
在这个例子当中,会话(session)对象(调用 requests.Session() 获取)会继续跟踪会话信息,像 cookie,header,甚至是包括运行 HTTP 协议的信息,比如 HTTPAdapter(为 HTTP 和 HTTPS 的链接会话提供统一接口)。
Requests 是一个非常给力的库,程序员完全不用费脑子,也不用写代码,可能只是逊色于 Selenium,虽然写网络爬虫的时候,你可能像放手让 Requests 库替自己做所有的事情,但是持续关注 cookie 的状态,掌握它们可以控制的范围是非常重要的。这样可以避免痛苦的调试和追寻网站的异常,节省很多时间。
HTTP 基本接入认证
在发明 cookie 之前,处理网站登录最常用的方法就是使用 HTTP 基本接入认证(HTTP basic access authentication)。现在已经不常用了,但是我们偶尔还是会见到它,尤其是在一些安全性较高的网站或公司内部网站,以及一些 API 上使用。
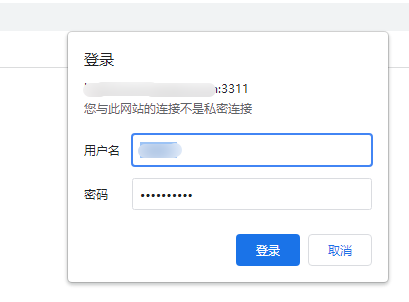
下面是一个基本接入认证界面截图:

和前面的例子一样,需要输入用户名和密码才能登录。
Requests 库有一个 auth 模块专门用来处理 HTTP 认证:
import requests
from requests.auth import HTTPBasicAuth

def http_auth():
    auth = HTTPBasicAuth('user', '1223**%%adw')
    r = requests.post(url="http://www.test.com:3311/", auth=auth)
    print(r.text)
虽然这样看起来是一个普通的 POST 请求,但是有一个 HTTPBasicAuth 对象作为 auth 参数传递到请求当中。显示的结果将是用户名和密码验证成功的页面(如果验证失败,会是一个拒绝接入的页面)。
其他表单问题
表单是网络恶意机器人(malicious bots)酷爱的网站切入点。你当然不希望机器人创建垃圾账号,占用昂贵的服务器资源,或者在博客上提交垃圾评论。因此,新式的网站经常在 HTML 中使用很多安全措施,让表单不能被机器人批量提交数据。
关于验证码的详细内容我不打算在这篇文章中讲解(因为文章已经够长了),后面我将会介绍使用 Python 的图像处理和文本识别方法来详述这部分内容。
如果你在提交表单的时候遇到一些莫名其妙的错误,或者服务器一直以默认的请求为理由拒绝,我在以后的文章中在介绍这些问题。
本文所有的源代码已经托管于 Github 当中,地址:https://github.com/sycct/Scrape_1_1.git
如果有任何问题,欢迎大家 issue。